The PLUM PICKER TM
 User's Guide
Payment Layer for Unattended Merchandising TM
Version 1.0
Upstate Networks Inc.
1001 Broad Street
Utica, New York 13501 USA

(800) 369-5797
info@upstatenetworks.com
Figure 1 – PLUM PICKER
TM with ASD W-Cable
PLUM
Picker Utility Installation
Before Contacting Technical Support
DESIGNED BY:
Philip gentile
|
Revision |
Date |
Description |
Written
By |
Approved
By |
|
1 |
9/17 |
Initial
Release |
Rob
Smith |
|
|
|
|
|
|
|
|
|
|
|
|
|
Introduction
The latest version of PLUM PICKER TM User’s Guide, along with
technical support and information about Upstate Networks, may be found on the
Upstate Networks World-Wide Web server at http://www.upstatenetworks.com/.
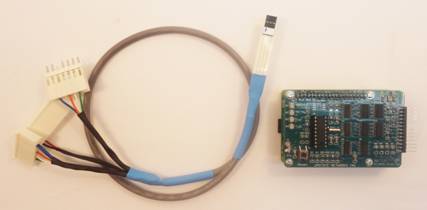
Figure 1 – PLUM PICKER TM with ASD W-Cable
Overview
The PLUM PICKER TM is a Raspberry Pi HAT (Hardware Attached on Top) which controls the item selection process normally reserved for a hardware keypad. When the PLUM PICKER TM is used in conjunction with a Raspberry Pi, the hardware keypad can be replaced with a touch screen, cell phone, etc. to handle the item selection process.
When an ASD W-Cable is connected to the PLUM PICKER TM, a signal is generated whenever a Vend Success or Door Open event occurs. This is useful when an application requires notification of a successful vend. It is also possible to be notified whenever the vending machine door has been opened which is useful for remote monitoring.
This document describes the Interface for the PLUM PICKER TM HAT. The PLUM PICKER TM interfaces with a SENSIT III VMC to handle the key selection hardware process.
System Requirements
·
A Raspberry Pi 3
·
An AMS SENSIT III VMC
·
A compatible
vending machine
·
Raspberry Pi
power supply (2.5A recommended)
·
9 pin ribbon
cable
·
ASD W-Cable (For Door Open
and Vend Success signals)
Hardware Installation
Install the PLUM PICKER TM HAT on a Raspberry Pi 3 with a Raspbian OS. (Serial Port settings are 9600, 8, 1, none.)
Locate connector P1 on the PLUM PICKER TM as shown in Figure 2. Connect one end of the 9 pin ribbon cable to connector P1 on the PLUM PICKER TM HAT such that the end with the red colored conductor lines up with pin 1. Notice that connector P1 is notched at pin 6. This is for proper alignment of the ribbon cable connector. The ribbon cable connectors are notched at pin 6, as indicated in Figure 4, and must be aligned with the missing pin on connector P1. Connect the other end to the AMS SENSIT III’s keypad connector as shown in Figure 3. Apply power by connecting the Raspberry Pi power supply and verify that the LED labeled D1 on the Raspberry Pi is illuminated.
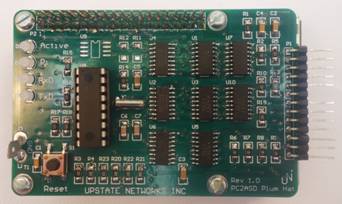
Figure
2 – PLUM PICKER TM Connector P1 Location
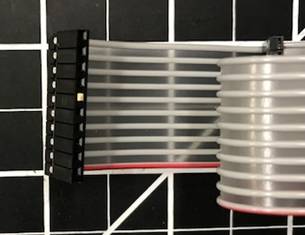
Figure
3 – Ribbon Cable Connector
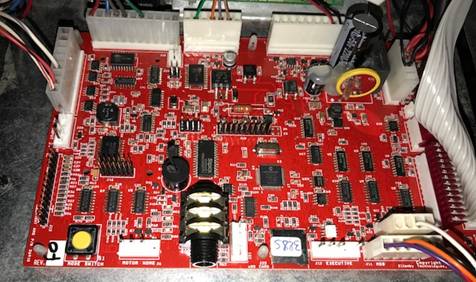
Figure
4 – AMS SENSIT III Keypad Connector Location
Hardware Specifics

Figure 5 - Connectors and LED locations
SPECIFICATIONS
Power Requirements:
+3.3 VDC
50 mA maximum
Environmental
Operating Temperature: 32°F to 158°F (0°C to 70°C)
Storage Temperature: -22°F to 165°F (-30°C to 74°C)
Relative Humidity: 5% to 95% Non-condensing
Physical Weight:
< 1 lb
Physical Dimensions:
Length: 85 mm, Width: 57 mm, Height: 11 mm
LED Designations (See Figure 5)
PLUM Picker Utility Installation
New Hardware Setup
Step1:
v Update Raspbian Jessie to the latest version by opening a command prompt and typing the following:
Ø sudo apt-get update
v Wait for the update to complete then type the following:
Ø sudo apt-get upgrade
v The update may take over 5 minutes to complete.
Step 2:
v Using a command prompt, type the following:
Ø sudo nano /boot/cmdline.txt
v Find the section of the string containing “console = serial0,115200” and delete it. Click ctrl+x and type y then press enter twice.
Step 3:
v Using a command prompt, type the following:
Ø sudo raspi-config
v Locate advanced settings and select it. Then, click serial and select “enable”
PLUM Picker Utility Setup
Step 1:
v Create a folder named “PLUM_Apps” in the /home/pi directory.
Ø Copy and paste the “PLUM_Picker” folder as well as the “PLUM_Picker_Utility” script file to the “PLUM_Apps” folder.
Step 2:
v In the “PLUM Apps” folder, right click on the “PLUM_Picker_Utility” file and click properties.
Ø Click the permissions tab and select Anyone under the Execute selection box then click Ok.
Step 3:
v In the “PLUM_Apps” folder, double click on the “PLUM_Picker” folder.
Ø Scroll down until you see the “PLUM_Picker_utility” icon.
§ Right click and select properties.
· Click the permissions tab and select “Anyone” under the Execute selection box and click ok.
Step 4:
v To open the PLUM Picker Utility, simply double click on the “PLUM_Picker_Utility” icon and click execute.
Ø Click the “Connect to Serial” button and you should see a pop up window with “connected to /dev/ttyS0” after a proper connection.
§ Next, click the “Hardware Reset” button then the “Soft Reset” button. You should see “ASD: 0B0010” in the Communications Log window as shown in figure 6 which indicates the PLUM Picker is initialized and ready.
§ After a successful key press is registered by the VMC, a response will be displayed as shown in figure 7.

Figure 6 - PLUM Picker Utility


Figure 7 – Key press example with responses
Technical Support
UNI offers technical support for PLUM PICKERÔ primarily by e-mail and at http://www.upstatenetworks.com.
Please read this manual thoroughly before contacting UNI.
Technical support is available via e-mail 24-hours-a-day, 7-days-a-week at tech@upstatenetworks.com.
|
Priority support will be given to people who have followed the instructions in the Before Contacting Technical Support section below. |
 Before Contacting Technical Support
When contacting technical support with a question, please have the following information available or enclosed with your e-mail:
Your name, e-mail address, fax and telephone number.
PLUM PICKERÔ serial number (Located on the packaging material) (No serial number label on the board? You think they are going to keep the packaging material?.
A detailed description of the problem you are experiencing.
Index